Forty seconds to generate a dragon with scales you could count. Six hours to print it. The print has no scales. The surface is a smooth lump with the silhouette of a dragon, and nothing in the slicer warned you.
Short version: a generator can paint detail onto a surface (a texture) or build it out of triangles (geometry). The printer only receives triangles. Anything painted disappears, anything smaller than the generator's grid cell never existed, and anything thinner than one nozzle line is dropped by the slicer. Look at the model with the texture turned off before you print, and you'll see exactly what you'll get.
Reason 1: the detail was a picture glued to the surface
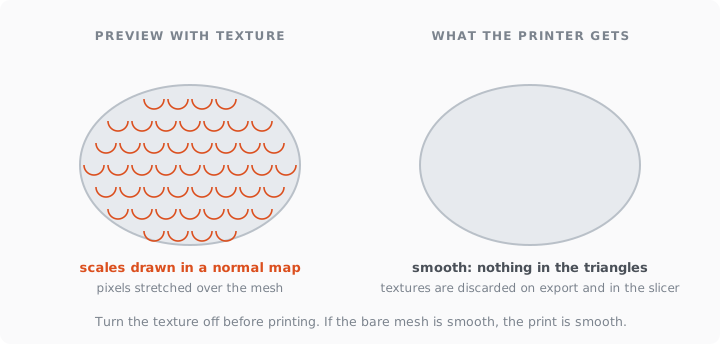
A GLB file carries a mesh plus images stretched over it through a UV map, the way a flat world map is wrapped onto a globe (glTF 2.0 specification). One of those images is usually a normal map: a texture that stores fake surface tilts so that lighting in the viewer draws bumps and grooves that are not in the shape (normal mapping). Generators lean on this hard, because a painted scale costs a few pixels and a modeled scale costs thousands of triangles.
Nothing is broken in the file. The mesh is fine; the expectation is wrong. When you convert GLB to STL, or when the slicer imports it, every texture is discarded and the smooth mesh underneath is what goes to the nozzle. The format difference is spelled out in STL vs 3MF →.
Reason 2: the detail was smaller than the generator's grid
Under the hood, most image-to-3D models describe shape as a field of numbers on a 3D grid and then extract a surface by walking that grid cell by cell, an algorithm called marching cubes or one of its descendants. A feature smaller than one cell does not exist for the algorithm: a fine ridge gets averaged into the cell, and two sheets of surface closer than a cell get welded together. That is why thin spikes on generated dragons come out as rounded nubs and why wire-frame objects fuse into blobs. It is also the mechanism behind a whole class of mesh errors, measured across five generators in our printability test →.
You cannot fix this after the fact. Repair tools work on the surface they are given; they don't know a ridge was meant to be there.
Reason 3: the detail was thinner than one line of plastic
Even geometry that survived the generator can be dropped by the slicer. A 0.4 mm nozzle lays a line about 0.42 mm wide; Bambu Studio's stock profiles set the outer wall at exactly that (process profile source). A feature thinner than one line cannot get a toolpath, so the slicer either skips it silently or extrudes a wisp that tears off. Two lines, about 0.85 mm, is the practical floor for anything that has to survive handling; the full table by wall count is in minimum wall thickness →.
This is where size enters. Generators output normalized shapes with no real dimensions, and a figure printed at 40 mm tall has all its photo-level detail below one line width. Our pipeline makes a generated model 70 mm on its longest side for this reason, and most figurines only start showing surface detail at 80 mm and up. The scaling ritual is in how to scale an STL to exact dimensions →.
The thirty-second check
Turn the texture off before you commit six hours of filament.
| Where | How | What you learn |
|---|---|---|
| Any slicer | Import the file. Slicers ignore textures, so the preview is already the truth | The honest surface |
| Blender | Viewport shading: Solid, with MatCap; untick Texture | Same, plus the ability to zoom into a spot |
| Slicer layer preview | Slice, then scroll the top layers and look for perimeters that vanish | Features below one line width |
| A caliper on the model | Measure the thinnest feature at print scale | Whether it is above 0.85 mm |
If the untextured view is smooth, the print will be smooth. If the layer preview drops a feature, scale up or thicken it. Our own model viewer shows bare geometry with neutral shading for exactly this reason: what you see there is what you print (generate from a photo →).
What you can do about it
Scale up first: doubling a 50 mm figure to 100 mm turns a 0.3 mm ridge into a 0.6 mm one, which is the difference between nothing and one line. Second, ask the generator for shape, not surface: prompts that say matte clay model, no texture, deep carved detail push detail into geometry rather than paint (prompt patterns that print →). Third, for real objects, photograph relief in raking light so the reconstruction sees it as shape rather than shading (how to photograph an object →). And fourth, accept that some detail belongs to the paint: a 60 mm miniature has always been a smooth casting with a painted surface, and the fix there is a brush.